
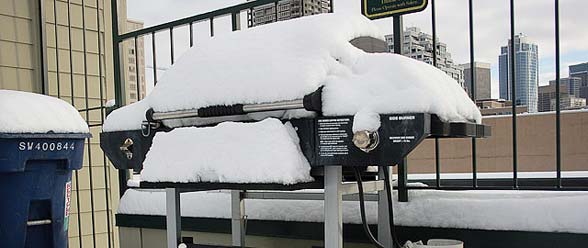
It is a sad day when you finally break down and decide to winterize your grill for the cold and snowy winter months. For me, unfortunately I tend to procrastinate it until the first time the snow starts to fly. I usually end up trying to winterize my grill and drain the water out of my boat engine so I don’t crack the engine block the evening of the first freeze. My hands get all frozen and I chip a tooth trying to hold my flashlight between my teeth while they are chattering away….but I digress.
I recommend taking the following steps to properly winterize your grill and prepare and store it for the winter to ensure a smooth transition to delicious BBQ when it starts to warm up in the spring.
I also recommend you don’t wait until the evening of the first snowfall to winterize your grill as it will save money from not having to go to the dentist to fix your chipped tooth from holding the flashlight between your teeth while you work.
- Start by burning off all residue from your grill.
I do this by starting the grill up and letting it run on high heat for 15 minutes or until all the food is burned off of the grill.
- Clean the grill grates
My grill has cast iron grill grates. To winterize your grill, take your wire grill brush and scrape all of the leftover food off of the grill grates and get things nice and clean while the grill is hot. After the grill has cooled, you can use soapy water to help with the cleaning process or you can even use oven cleaner to help with the tough spots. Make sure you thoroughly rinse the grill grates off with water to remove any soap (or oven cleaner) residue.
For those using porcelain grill grates do not use metal or wire brushes to clean your grates. Instead, use a soft bristle or nylon grill brush to ensure that you do not damage your porcelain grates

- Remove the grates and clean the inside of the BBQ Grill
When the grill is cool, take out the lava rocks or metal heat deflectors and clean the inside of the grill. This is a good time to install new lava rocks so the grill is all ready for next year.
- Clean the outside of the grill
Wipe down the outside of the grill with a damp cloth. I typically take an old rag and a bucket of hot soapy water and clean every surface of the grill including the propane tank and all hoses with the rag. I even clean and wipe down the inside of the lid where all of that carbon build up exists that looks like peeling black paint. I also take a hose to the cloth grill cover and get that clean as well.
Many grills include a drip pan to catch the drippings from a particularly juicy cut of meat. During this cleaning step, make sure that you empty and clean the drip pan as well.
Some people find that there is caked on food or dirt that has built up over the summer that needs extra attention. You can use cleaners, but be careful using abrasive scouring pads or chemicals to remove caked on stuff so you don’t ruin the paint of the grill. If you are using abrasive cleaners, you might test a small section on the back of the grill to see if the paint will be impacted to avoid ruining the look of your grill.

- Refer to your grills owners manual for additional recommendations
Refer to your owners manual that came with your grill (or find a copy on your grill manufactures website). Some manufacturers recommend that you wipe down parts of your grill (including your grill grates) with a light coating of oil to help avoid rust. But others don’t recommend it at all. Make sure that you follow your manufacturers recommendations so you don’t void your grill’s warranty.
- Fix any problems that exist with your grill
Take the opportunity to fix anything wrong with your grill. Make sure all hoses are not aging and have no cracks. Clean all the burnt food off of the elements in the grill and if they are cracked or rusted, order new burners from your grill manufacturer. Fix handles, temperature gauges, etc. anything that will slow you down from a running start in the spring.
- Storing your BBQ Grill for the Winter
Purchase a good grill cover to keep the dirt, rain, snow, etc. from accumulating on the grill. If you are using a grill cover from last year, make sure that it is still in good condition and has no tears or holes. If there are problems, buy a new cover. It is much better to spend $30-$40 on a new cover than $hundreds or even $thousands on a new grill next year because your grill is rusted out during the wet months of winter and spring. Make sure your grill (and the cover) is completely dry before storing it, so you avoid rust.
If possible, store your grill inside in a dry location away from the rain and snow of winter and spring. A garage, storage room, closet, or even a shed is perfect. If you can’t store it inside, storing it in a covered location to keep the rain and snow off the grill is much better than nothing. Make sure that your grill is stored in way that it can’t fall over. I stored mine on my back deck and during the winter, a big storm hit with a lot of wind. The wind from the storm blew off a bunch of shingles from my roof and also caused my grill to tip over, breaking the front handle of the grill and bent the door underneath the grill. Ordering a new handle and door cost me the equivalent of the first couple of steak dinners for the family in the spring – and made me a little grumpy. Next year I will be more careful on how I store my covered grill.
Taking care to winterize your grill during the cold and snowy winter months will provide years of extra life to the grill and ensure many seasons of fond family memories.
Did I miss anything? Post a comment to fill in the details.


I store mine outside. And disconnect the propane tank hose and wrap up both the tank and valve with a plastic bag to keep spiders out. After the inside is dry, consider spraying cooking oil on everything but the burners. That provides some rust protection.
For those of you who want to get the grill COMPLETELY clean of ALL grease and build up, simply put the grate in a plastic garbage bag, pour a bottle of ammonia in the bag (you do not have to soak the grate). Wrap the bag tight and put it inside another garbage bag wrapped tight. Wait 24-48 hours. The fumes from the ammonia will get all the grease off and you just lightly wipe it all off.
Should you disconnect the propane tank?
Nice post. I just bought my boyfriend a grill for his birthday and it occurred to me that we don’t know how to store it when we are finished. We don’t have any thing to cover it with. We don’t know how to winterize it, I didn’t even know that a grill needed to be winterized. I need to look for outdoor grill covers and cleaning supplies before the summer is over. I will have to send this to my boyfriend. Thanks so much for sharing.
Brilliant article, thanks. It just occurred to me that our grill will need to be winterized, too. One detail I thought of: our grill has a removeable drip pan. That should get cleaned out too if you have one.
it should be noted that if you do plan to store your grill inside, on a porch or an attached garage or some other enclosed space, the 20# propane cylinder should not be stored inside as well. Best to keep it in an outdoor storage unit that is not attached to your living quarters.